Quantcast
Channel: Blogs
Viewing all 737 articles
Browse latest View live

Planning an ASP.NET Web Forms Application: Controllers and Testing

$
0
0

In spite of the many choices for web developers today, ASP.NET Web Forms is alive and well. One of the platform’s many strengths is its long history of stability. Microsoft has kept it current with frequent updates and the .NET Framework 4.7.1 continues to add features that can be utilized by Web Forms applications.

So what does that mean to you? If you are getting ready to build an ASP.NET Web Forms application, what should you consider?

My colleague, Ed Charbeneau, shares his thoughts and recommendations in the “Planning a Modern Web Forms Application” whitepaper. In this post, we’ll look at two excerpts from that paper – Using Controllers and Routing in Web Forms and Testing Methodologies. He explores the ability to take advantage of web API controller architecture without switching to ASP.NET MVC and he shares his thoughts on testing methodologies.

Using Controllers and Routing in Web Forms

Developers don't need to switch to ASP.NET MVC to take advantage of web API controller architecture in their application. Adding Web API controllers to Web Forms allows the application to leverage simple, but powerful JSON based REST endpoints. Web API endpoints provide a low friction way of supplying data for consumption by AJAX calls from the client side of the application. In addition, these endpoints allow Web Forms to share data with external applications such as reporting services, mobile applications and more.

Web API controllers can be added to a Web Forms application and any point in the application's development cycle. New projects can include Web API as part of the File > New > Project template experience, while existing applications only need to add a WebApiConfig.

By default, Web API will be configured to emit XML from controller actions. To enable JSON formatting simply remove the XmlFormatter from configuration.

   // WebApiConfig.cs
   // Remove the XML formatter
   config.Formatters.Remove(config.Formatters.XmlFormatter);

To add Web API to existing applications, simply add configuration class WebApiConfig to enable Web API routing. The configuration below allows enables both attribute based routing and convention based routing.

//WebApiConfig.cs
publicstaticclassWebApiConfig
{
    publicstaticvoidRegister(HttpConfiguration config)
    {
        // Web API configuration and services
        // Web API routes
        config.MapHttpAttributeRoutes();
 
        config.Routes.MapHttpRoute(
            name: "DefaultApi",
            routeTemplate: "api/{controller}/{id}",
            defaults: new{ id = RouteParameter.Optional });
 
        // Remove the XML formatter
        config.Formatters.Remove(config.Formatters.XmlFormatter);
    }
}
 
//Global.asax.cs
publicclassGlobal : HttpApplication
{
 
    voidApplication_Start(objectsender, EventArgs e)
    {
        ...
        GlobalConfiguration.Configure(WebApiConfig.Register);
    }
}

Testing Methodologies

How you test and what you test is less important than the fact that you test something. It’s likely the case that you’ll want to test each module or unit of code by writing unit tests. When all of the units of code unite to form a running application, you’ll want to do functional end-to-end testing. Below I detail the tools required:

Frameworks

Docs

Microsoft.VisualStudio.TestTools.UnitTesting

Microsoft’s standard unit testing library

XUnit

A free, open-source, community-focused unit testing tool for the .NET Framework

NUnit

One of the most popular unit testing frameworks for .NET


To take testing to the next level, consider complete a test automation solution for integration testing at the GUI level. One such way to integration test your GUI is with Progress Test Studio.

For a more detailed view of key considerations – software management tools, development process and methodology, tooling and development, backend methodologies, data and more – make sure to download Ed’s “Planning a Modern ASP.NET Web Forms Application” whitepaper.

Download Ed's Whitepaper

And while you’re at it, if you haven’t played with Telerik UI for ASP.NET AJAX consider downloading a free trial. This feature-complete UI toolkit includes more than 100 controls, themes and more and enables you to quickly and easily deliver a sleek UI and delightful UX, increasing your productivity and your app’s performance.


Resources for Upgrading Your Hybrid Apps to NativeScript

$
0
0

Yes, in fact, there is life after Telerik Platform! While the recent news that Telerik Platform is set to retire in May 2018 elicits mixed emotions, the good news is that Progress is in no way abandoning our mobility customers! Over the past year the NativeScript team has been working hard to release new tools and improve the core framework that allows you to create truly native, cross-platform, apps using the same web skills you've been using to create hybrid apps.

The future of mobile app development is NativeScript, and we will help you get there!

Make no mistake: NativeScript is at the core of the Progress mobility strategy going forward. Progress is dedicating significant resources to make sure your transition from hybrid (i.e. Cordova/PhoneGap) to native (NativeScript) is as seamless as possible.

With that being said, let's make sure we are aware of all the resources available today, for free, to help us migrate from hybrid to native:

HybridToNative.com

With the online resource hybridtonative.com, we've partnered with the community to provide a guide on upgrading your existing Angular-based hybrid apps to NativeScript.

nativescript app showcase

This extensive guide contains everything you need to know when upgrading your hybrid app. From a comparison of hybrid and native technologies, to a look at using the Ionic CLI vs the NativeScript CLI, to comparing UI implementations, and more, hybridtonative.com should be your first stop on your upgrade path.

Migrating from Cordova to NativeScript

In the article, Migrating from Cordova to NativeScript, we take a high level look at an existing hybrid app and what it takes to upgrade it to NativeScript.

By breaking down an existing hybrid app and looking at the views/layouts, JavaScript business logic, and CSS styling, we see how a transition from hybrid to native isn't nearly as difficult as one might think.

For example, we can take this HTML from a hybrid app:

<header class="header">
    <h1>todos</h1>
    <input class="new-todo" placeholder="What needs to be done?">
</header>
<section class="main">
    <ul class="todo-list">
        <!-- item template goes here -->
    </ul>
</section>

...and convert it to a truly native view with NativeScript-flavored markup:

<StackLayout>
    <Label text="todos" class="title" />
    <TextField class="new-item" text="{{ newTodo }}" hint="What needs to be done?" />
    <Repeater items="{{ todos }}">
        <!-- item template goes here -->
    </Repeater>
</StackLayout>

Take a closer look by reading Migrating from Cordova to NativeScript.

Modernizing One Hybrid App at a Time

The NativeScript Developer Relations team put together an online webinar on Modernizing One Hybrid App at a Time. This hour-long video contains a wealth of information on the latest in NativeScript tooling, strategies on sharing code between web and mobile, and how to create an engaging user interface with NativeScript.

Watch Modernizing One Hybrid App at a Time on YouTube now:

Migration Guides

Progress is also providing an extensive set of migration guides to ease your transition from Telerik Platform to third party tooling and service offerings:

Other NativeScript Resources

There are plenty of places you can go next to learn more about NativeScript and the new NativeScript tooling options:

Top 10 .NET Development Tweets that Broke the Internet in 2017

$
0
0
The end of the year is a good time to reminisce and enjoy again some of the highlights of the past 11 months. In this blog, we’ll look back at the top 10 Twitter posts for .NET developers in 2017.

With 2017 coming to an end, it’s time to reminisce and look back at the top 10 Twitter posts for .NET developers throughout the year. It would be an understatement to say that 2017 was an eventful year for .NET and Windows developers, especially when we look at all the great additions Microsoft teams brought to the scene, such as the new version of Visual Studio 2017, .NET Core, .NET Standard, XAML Standard and the UWP Community toolkit.

Here are the top 10 .NET and Windows tweetsthat broke the Internet in 2017. Who do you think got the most attention this year? Scott Hanselman? Scott Allen? Erich Gamma? Let's see!

10. Peter Marcu

9. Clint Rutkas

8. Brian Peek


7. Randy Olson


6. Miguel de Icaza


5. Scott Hanselman


4. Immo Landwerth


3. Satya Nadella - Happy Birthday Visual Studio!


2. Win De Cleen


And the winner is...

1. Paul Stamatiou


Is there any tweet that you think should have made the list but didn’t? Well then, share it in the comment section below.

This blog probably wouldn’t happen if it weren’t for DevCraft, I mean, DevCraft is part of the Telerik UI tools’ DNA and where would we be without our DNA? So if you want to build sleek web, mobile or desktop applications with .NET, try DevCraft - a comprehensive bundle of performant UI components covering all .NET technologies.

Check out DevCraft

Get Going with Kendo UI & Vue: a GIF Guide

$
0
0

In this short tutorial, learn how to install, create and style a Vue app quickly with Kendo UI. And GIFs.

I am a big fan of Vue.js so I was delighted when the team said we would be supporting Kendo UI component wrappers for it . Let's jump in and create a Vue application with the Vue CLI and add a color picker component. Here's what we'll be covering:

Creating A Vue App

First, we need go to our terminal and globally (-g) install the Vue CLI using npm

npm install vue-cli -g 

installing the vue cli

Now that the CLI tool is installed globally we can call on its commands from anywhere. So, let's head to the directory we want our new, awesome Vue ❤ Kendo UI project to live in. From here we can initiate the project with the command vue init with the template webpack-simple and project name gif-guide_get-going-kenodui-vue. You can choose your own custom template or pick from one of the official templates listed on the Vue CLI repo. Here's the list and descriptions that they have:

  • webpack - A full-featured Webpack + vue-loader setup with hot reload, linting, testing & css extraction.
  • webpack-simple - A simple Webpack + vue-loader setup for quick prototyping.
  • browserify - A full-featured Browserify + vueify setup with hot-reload, linting & unit testing.
  • browserify-simple - A simple Browserify + vueify setup for quick prototyping.
  • pwa - PWA template for vue-cli based on the webpack template
  • simple - The simplest possible Vue setup in a single HTML file

Of course, for the project name you can pick whatever your little heart desires

vue init webpack-simple gif-guide_get-going-kendoui-vue

initiating the vue app

We now have a directory with our new project in there. Let's make sure everything is working the way it's supposed to by first heading into that directory then installing all our dependencies. We do this with the command npm install or just npm i for short.

npm install

Okay, if everything worked as it was supposed to we should be able to start up our app and see what it looks like. We can run npm run dev which is one of the scripts the Vue CLI has made for us. If you take a look in the package.json file you can see they actually supplied us with two npm scripts:

package.json
...
  "scripts": {
    "dev": "cross-env NODE_ENV=development webpack-dev-server --open --hot",
    "build": "cross-env NODE_ENV=production webpack --progress --hide-modules"
  },
...

Both scripts are using cross-env (here's more info on that) but the dev script is using webpack-dev-server, a little Express server, and setting the open and hot flags. The open flag just opens the application in your default browser instead of you having to do it. The hot flag adds the HotModuleReplacementPlugin and switches the server to hot mode meaning it exchanges, adds, or removes modules while an application is running, without a full reload.

npm run dev

Since the dev script had the open flag your browser of choice should open up automatically and go to localhost:8080 but you can always head there manually as well. Let's take a look at what we have so far.

first look

Lovely

I really like to have a good place to go back to if/when I break things. So, we'll add git to version control our project by going into the project directory and running git init. Then we add all the new files by running git add . and make a commit of these changes with git commit -m '<message here'>. Next, we assign a remote repo on Github.com with the command git remote add origin <url to repo>. I had already created an empty repository on GitHub, you can check out how to do that here or do it on GitLab. Finally, we push our changes to the repo on GitHub with, git push origin master.

git'n ready

Possible crisis averted! The repo we used as our origin is also going to be our example project that we can follow along with each code change we make in this post. At the end of each section that we change some code, look for the emoji to find the link to the commit and see what was changed.

For instance:

Link to the initial commit.

Install All The Things!

It's time to equip our project with all our fun Kendo UI accoutrements All we'll need for this project is the kendo-ui, kendo-theme-default, and kendo-inputs-vue-wrapper modules from npm. We can install those all in one line with the command:

npm i @progress/kendo-ui @progress/kendo-default-theme @progess/kendo-inputs-vue-wrapper

Since we're using the latest version of npm (v5.5.1 at the time of this post), we don't need the --save flag to make sure this module is saved as one of our dependencies, npm does that by default.

installing kendo ui

With that we have all our puzzle pieces! Now, let's put this all together.

Link to the Kendo UI installation commit.

Importing the Kendo UI Modules

Setting Up

Today, to keep things simple, we'll be doing all our edits in the src/App.vue& src/main.js files but first let's take out the trash , that is remove some code we don't need. In our src/App.vue there is a bunch of content that came with the default install so we can get rid of that.

deleting things!

In our src/App.vue file this is all we should have left:

<template>
  <divid="app">
  </div>
</template>
 
<script>
export default {
  name: 'app',
  data () {
    return {
    }
  }
}
</script>
 
<stylelang="scss">
#app {
  font-family: 'Avenir', Helvetica, Arial, sans-serif;
  -webkit-font-smoothing: antialiased;
  -moz-osx-font-smoothing: grayscale;
  text-align: center;
  color: #2c3e50;
  margin-top: 60px;
}
 
h1, h2 {
  font-weight: normal;
}
 
</style>

The first thing we deleted was the logo, we want to make sure we delete that unneeded resource as well out of src/assets/logo.png. We can do this with the rm command:

rm .\assets\logo.png

deleting ze logo

Link to the deleting things commit.

Importing All the Kendo UI Fun

I am a big, big fan of the Kendo UI default themes because making everything look nice together is hard! The Kendo default theme makes everything look good and also makes it all responsive. Score! One less thing for you to juggle. To add our styling we just need to import the Kendo UI default theme that we installed earlier in our src/main.js file. This is also where we import the kendo-ui library and the KendoColorPicker, so let's do all that now.

Importing all the things!

This is what the src/main.js file looks like now:

import Vue from 'vue'
import App from './App.vue'
import { KendoColorPicker } from '@progress/kendo-inputs-vue-wrapper'//
import '@progress/kendo-theme-default/dist/all.css'//
import '@progress/kendo-ui'//
  
newVue({
  el: '#app',
  render: h => h(App)
})

You can see here when we import the Kendo UI component we specifically asked for the KendoColorPicker. The kendo-inputs-vue-wrapper library also includes the ColorPalette, FlatColorPicker, MaskedTextBox, NumericTextBox, Slider, and Switch components , but we only need the KendoColorPicker today.

Including the KendoColorPicker Component

In order for the KendoColorPicker component to be used, we're going to register it as a global component and add it to our components collection. We register it using Vue.component() and include the components list inside the new Vue({}) block. You can check out more information about Vue.componenthere

Adding the component

Once, we're done with src/main.js it should look like this:

import Vue from 'vue'
import App from './App.vue'
import { KendoColorPicker } from '@progress/kendo-inputs-vue-wrapper'
import '@progress/kendo-theme-default/dist/all.css'
import '@progress/kendo-ui'
 
Vue.component(KendoColorPicker.name, KendoColorPicker) //
 
newVue({
  el: '#app',
  render: h => h(App),
  components: {       //
    KendoColorPicker
  }
})

Link to the commit where we add the component .

Adding A Color Picker

Okay, we're going to add a color picker UI component real quick. I know, "real quick" sounds unreal :roll_eyes: BUT since we imported the component we only need to add ONE line in the template to add the color picker! This is why I've grown to Kendo UI components so much, once you understand how to include the components adding them to your project is super easy. So, today we're just adding the ColorPicker component but it's basically the same steps with all the fun Kendo UI for Vue components.

  1. Use npm to install the module.
  2. Import the component we want.
  3. Add the component to the template and assign its parameters & events.

I've also added a little h1 header, because why not Then we add the color picker component with <kendo-colorpicker> and use v-model to bind color. Here's more information about what v-model does. Then under that in order to display what color was chosen I've added a little span with v-text to bind it to whatever color has been chosen in the color picker. Then the very last thing to do is export color with a default value down in our <script> tags.

adding the color picker

The final version of the src/App.vue will look like this:

<template>
  <divid="app">
    <h1> Fun with Colors </h1>
    <kendo-colorpickerv-model="color">ColorPicker</kendo-colorpicker>
    color: <spanv-text="color"></span>
  </div>
</template>
 
<script>
export default {
  name: 'app',
  data () {
    return {
      color: "5CE500"
    }
  }
}
</script>
 
<stylelang="scss">
#app {
  font-family: 'Avenir', Helvetica, Arial, sans-serif;
  -webkit-font-smoothing: antialiased;
  -moz-osx-font-smoothing: grayscale;
  text-align: center;
  color: #2c3e50;
  margin-top: 60px;
}
 
h1, h2 {
  font-weight: normal;
}
 
</style>

Link to the commit adding to the template.

Let's what we've got!

If you still have npm run dev running in the background your content at localhost:8080 should have automatically updated. Otherwise, go ahead and run npm run dev again. You should see this lovely site with a color picker there waiting for you.

final outcome

You can see here that without adding any additional CSS we have a fancy looking color picker that's using the default Kendo UI styling so it will match all the other components. All the interactions here where the user can scroll or type out the color they want, come right out the box with no additional JS needed. Pretty cool, right?

What's Next :thinking:

Bravo, you smart cookies ! If you stepped through the code with me you now have a running Vue app using a Kendo UI ColorPicker component. Next you can check out all the other components and see which ones you want to use in your project. Here are some other resources that will help you with your next steps too!

Resources:

Always feel free to reach out to us on Twitter @KendoUI. Thanks so much for coding with me, I can't wait to see all the awesome things you do with Kendo UI & Vue.js!

What Developers Were Fired Up About In 2017: Top 5 JavaScript Blogs

$
0
0

Find out the top 5 articles developers read on JavaScript in 2017—rest assured, each one is worth a read.

Looking back at the most read articles on our blogs in 2017 is telling, you can learn a lot about the topics developers were most interested in this year. The following articles have all been read over 10,000 times—some spawned intense discussion, others reverberated around the Internet, shared by fellow developers on social media, reposted in community websites and newsletters. All of them are worth a second read, not to mention a first.

Let’s see if there’s any top content you’ve missed:

#5: How I’m (Not) Using jQuery

by Raymond Camden

This opinion piece/tutorial opens by stating what it’s not about: “Let me begin by saying that this is not yet another post about how you don't need jQuery. In case you haven't noticed, that's already been covered. Roughly 8 million times.” I won’t tell you how it ends though; there will be no spoilers—I’ll let you find out whether Raymond is(n’t) using jQuery yourself. Extra fun if you also join the discussion that formed in the comments.

#4: A Step-By-Step Guide for Building Master-Detail User Interfaces with Angular

by TJ VanToll

Evergreen as TJ himself, this monster tutorial delivers on the promise to provide a comprehensive step-by-step guide for creating master-detail UIs with Angular, a popular way to build mobile apps. “Angular is well suited for implementing master-detail interfaces, as it has a number of the necessary features you need baked in, such as data binding, routing, services, and a whole lot more,” writes TJ. There’s one way to verify his words—read on.

#3: Quick Angular Hosting with the Angular CLI and GitHub Pages

by TJ VanToll

If you’re building up a prototype for a client, or a little app to show your friends and coworkers, the Angular CLI and GitHub Pages make getting a new Angular app live amazingly fast and easy. This must be why hundreds of readers keep coming back to this article every month.

#2: An Introduction to Observables for Angular Developers

by Jen Looper

When developing mobile apps and web sites, observables are often used to populate the app’s UI with external data, asynchronously. Jen does an excellent job presenting the abstract concept of observables in an understandable way. In this piece, she explains what they are, why they are a preferred method of handling data, how RxJS works within this context, and some real world examples of where they are used.

#1: Component Property Binding with @Input() in Angular 2& Component Event Binding with @Output() in Angular 2

by Todd Motto

As Google released Angular 2, they inflicted some emotional damage on the developer community, lack of backward compatibility and all. Then brave souls such as Todd Motto sought to tackle this inconvenience and created AngularJS to Angular 2 migration guides for their fellow JavaScript developers to lean on. The increasing popularity of Todd’s two articles on component architecture throughout the year shows just how necessary and appreciated such content is.

#1 JavaScript Long-Form Content: The Future of JavaScript in 2017 and Beyond

Our most popular JavaScript whitepaper for 2017 was *ta-daaaa* The Future of JavaScript: 2017 and Beyond.” Don’t worry, we have “The Future of JavaScript: 2018 and Beyond” in the works—and it’s coming soon!

Thank you for reading so far. Come back next week for out top .NET content of 2017!

9 Reasons to Choose a Bundle Over an Individual Product

$
0
0

Thinking about whether you need a comprehensive development toolbox over individual products? Here are 9 reasons to strongly consider a toolbox for your next project.

Let’s do a thought exercise. Imagine that you could build a house the way that agile teams build software—an “agile house.”

You don't create a detailed blueprint and have someone build it all in one fell swoop. Instead, you build a room that will shelter you from weather and that you can put a bed into. Once that's squared away, it'd sure be convenient to have a bathroom and shower, so you kick off a project for a second room. In parallel, you hire plumbers to outfit that room with running water and waste disposal.

And so it goes for the rest of your house. You bring in dozens of contractors and specialists to run electrical wires, install an oven, build windows into the great room, and the like. Reminiscent of commercial software chaos, the house comes together in fits and starts.

As fun as the agile house sounds, imagine the chaos and its cost! What if every room used different sized pipes, different material for the walls, and different electrical standards? Can you imagine the hodgepodge of weird workarounds? And can you imagine the cost of the different contractors needing to solve the same problems over and over again with countless adapters and oddball solutions?

Luckily, that doesn't happen with houses, even when you use contractors to add a house extension or refinish a room. And that's no accident. The construction industry standardizes its approach to house building to create a coherent whole.

We in the software industry can take a cue from this. We can actually both reap the benefits of an agile approach and avoid the chaos of a piecemeal approach. And we can do this with a development bundle.

Let’s take a look at just how this works to keep fragmentation out of your approach, while actually giving you a competitive advantage.

1. Development Toolbox Cost Savings over Piecemeal Approaches

In the world of the disjointed house, you have redundant contractors performing redundant or unnecessary labor. In the software development world, the same thing happens with large ecosystems.

If you bring in a hodgepodge of different vendors and sometimes roll your own version, you face compatibility and dependency issues. This can be penny wise and pound foolish, as you save a bit of money going with cheaper solutions only to give it all back when your team spends hours or days chasing down weird compatibility problems. And that's assuming a given issue can be localized. The waste compounds if it involves coordinating support across multiple teams or departments in your organization.

And, on top of unplanned issues, even the planned actions can create waste. Imagine using a bunch of different UI toolsets across your applications. When you decide you want to update to a newer version of the .NET framework, you're going to have a serious chore on your hands. Even assuming the fragmentation saves you money up front, it will cost you money every step of the way after that.

It can pay major dividends to get ahead of this problem. Rather than deal with fragmentation issues, you can save more than 40% of your development budget as well as time if you decide to standardize your development through DevCraft bundles. This will free time and money to invest in faster growth and new business.

2. Addressing All of Your Needs

Even as fragmentation hurts your bottom line, it's practically required in the modern software world. Today's market requires skills and tools across a broad spectrum of platforms. You need accessibility on web, mobile and desktop. And each of those comes with its own form of sub-fragmentation: different browsers and operating systems.

The right development toolkit—a sufficiently comprehensive one, like DevCraft—lets you keep that fragmentation at arm's length. DevCraft brings the best of Telerik and Kendo UI together in convenient bundles, including a wide range of UI, reporting and productivity tools for both .NET and JavaScript technologies, with support that’s got your back in every step of your project.

Think back to the "agile house" where, with the right standardization, you can have your cake and eat it too. The right toolkit lets you deploy to these fragmented environments without fragmenting your own efforts and creating waste.

But you can realize a much deeper advantage as well. Externalizing deployment fragmentation lets you avoid effort duplication, but what about concerns like data tooling, document processing, and always up to date IDE productivity support? If you choose the right partner, you can look to them for solutions in any common problem space and you can count on them for extensible APIs to let you build on what they've started.

Imagine the handiness of this line of thinking. "Having a common look and feel across all our deployment targets saves us a lot of time and money, but wouldn't it be great if this same vendor offered productivity tools and utilities to help with unit testing?" When you realize that they do have those things and others besides, you get a one stop shop for where to go first when you think, "someone has probably solved this problem already so that we don't have to." A development toolbox vendor that has a long track record working with a variety of companies will naturally cover a wide range of complex business scenarios out of the box.

3. Giving You Flexibility

The comprehensiveness of a development toolbox goes beyond just addressing your needs in the moment, though. You can rest assured it will continue to address your needs even as they evolve.

In the early stages of any given effort, you can rely on these tools to assist you with rapid prototyping. Hundreds of instantly ready UI controls in DevCraft with detailed demos let you put together prototypes very quickly across all sorts of .NET platforms, like Xamarin, ASP.NET Core and UWP, and JavaScript like Kendo UI and ASP.NET MVC. And you can also put some meat on the bones quickly using data tools and reporting as well. Prove the concept quickly and then adapt.

But the toolkit helps just as much when you're in the throes of building or in maintenance mode. The same platform that enables rapid prototyping also makes it a lot easier to adapt to changing requirements as they come in, and to propagate those changes across your application portfolio as needed. Everyone has experienced the feeling of having the rug pulled out from under them with changing requirements. "That looks great, but can you just change the styling on all of the grids real quick before we go live?" Imagine having the ability to say, "yes, we should be able to do that."

4. Helping You with Peace of Mind about Security

Everyone that's sat in a software development shop knows that security matters to upper management and executives. A lot. And while it might not seem that a development toolbox would necessarily offer direct help with that, you may be surprised.

Think of it this way. If you write your production components and tools by hand, then any attempted exploit against them affects only you. And you have only yourself to help with support.

If, on the other hand, you use a development toolbox like DevCraft, you become one of hundreds of organizations with those tools. You now have a committed partner to support you on security issues—one who has a lot of experience defending against attacks and who will provide dedicated support. You're no longer alone.

5. Boosting Your Productivity

One of the most obvious benefits of a comprehensive development toolbox comes in the form of productivity. When you use pre-built, customizable tools, you don't spend time building them. Instead, you spend your time building things specific to your domain.

"To say that using Telerik tools slashed our development time is an understatement," said Tom Stein of NASA in a case study. Using the toolkit means that you focus on business logic instead of more standard concerns, such as GUI controls and reporting. By leveraging these reusable components, you'll develop the same apps in your portfolio in much less time. This holds doubly true in the case of DevCraft, where similarity to default controls and intimate knowledge of the Microsoft ecosystem make excessive customization much less likely.

Going back to the metaphor of the agile house, imagine if contractors hand-welded their own electrical conduit and junction boxes. Wouldn't you rather they simply buy these materials at the store, instead of wasting time reinventing the wheel?

6. Ease of Use

Have you ever had the pleasure of using some kind of custom chart built by the guy in the cubicle across from you? Of course, "pleasure" may not be the right way to describe that if you work at a company that doesn't specialize in commercially sold components. Most likely that developer built something that only he understood well, and using it involved endless trips to his desk to ask about some arcane setting or bit of syntax.

When you cast your lot with a development tools company and a toolbox, you use controls made by people who do this for a living. The commercial success of that company rests upon making things that are easy and pleasant to use. So when you look to an organization like Progress and the community of 2.1 million developers it has built around its Kendo UI and Telerik UI tools, you realize that it has commercial success, which means that it makes things easy for you to use.

You can look forward to considerations like customizable themes, intuitive settings, and controls modeled after the default ones that are part of their respective Microsoft frameworks. That is what draws and keeps so many developers.

Thanks to intuitive APIs, alongside thousands of demos with source code availability, comprehensive documentation and a full assortment of VS templates, you will get up and running with the products in DevCraft bundles in no time.

7. Making Support and Maintenance Easy on You

When you invest in a feature-rich development toolkit, its capabilities are critical—do they add value and let you go fast? But also need a partner that helps you with your own support and maintenance by offering excellent support and maintenance to you. When building your agile house, enlisting a contractor gives you standardization, but enlisting the right contractor ensures a house where few things go wrong and maintenance is easy.

In a development toolbox vendor, you want uniform and streamlined documentation and support resources available at all times. And you want all of your controls and tools coming from the same place and designed by the same people. With DevCraft, you get that, because it sits in the sweet spot of tool vendors. It's large enough to provide dedicated outstanding and flexible support to customers, but not so large that support is fragmented. The same developers work on the whole toolkit, and those developers actually provide support to customers and users, rather than a generic help desk.

The Telerik UI tools have been respected and valued tools for over 10 years, and its developers are deeply invested in the developer community. This means they feel the pains of their customers and know they'll appreciate things like a predictable release cycle (3 times per year) and support within hours (for DevCraft Ultimate). And, in general, it means you can count on them for support and maintenance for your components, making supporting and maintaining your own application much easier.

8. Consistent Look and Feel Makes You More Appealing to Users

When looking for competitive advantages, look and feel is surprisingly critical. As developers, it's easy for us to think in terms of satisfying requirements and making tests pass. But as Apple and fast followers have proved over the last decade, appearance and user experience matter. A lot.

Without help, as your application suite grows, maintaining a consistent look and feel gets harder and harder. And when discrepancies creep in, you start to look sloppy.

Using a development toolbox helps you standardize the look and feel across the board. It allows you to "present a professional, well-packaged front end" to your users, which makes for a serious competitive advantage when your contemporaries don't do the same. And making use of themed, Visual Studio-integrated solutions ensures that the consistency is easy for developers to implement and maintain. As one user put it, "adoption of a development toolbox proved a great move forward in terms of: faster development, reliability, and better UX with stunning UI."

By leveraging the broad array of themes, skins, styling and customization options with DevCraft, your application will awe even the best frontend designers

9. Predictable Costs and Obvious Value

Over the course of this article, you've gotten to see the value for yourself. Getting a competitive advantage via productivity, user appeal, and other important concerns makes it easy to calculate and speak about return on investment. As you grow, you need better tooling. Reason about it for yourself by realizing that if a $2000 tool saves you 20 hours of development labor per seat (at market value of $100 per hour), it pays for itself. And that's an understated figure for market value of development labor.

But if we look specifically at DevCraft Complete and DevCraft Ultimate, we see additional benefits. Via economies of scale, you realize a much better price on the complete toolboxes than on the individual components ala carte. In fact, you get 11 products for the price of as few as 2 individual ones. This gets you all new features, fixes, and support for a year, and then a 50% discount on renewals, with document processing included at no additional cost.

There's a huge advantage to this pricing and to developer toolboxes in general. But there's also strategic advantage to knowing your costs and your value up front and being able to plan your budget accordingly. That's much harder to do when rolling your own productivity tools, controls, and components.

Looking Toward the Future

The software development world is one where we build on the work of predecessors. The C programming language emerged to save those who didn't need assembly language. Operating systems emerged to abstract away hardware details. For as long as people have been writing code, some of those people have been building and selling tools for the others to use.

In the modern world, with hundreds of languages and Javascript frameworks coming out every day to glue them together, relying on others for code has never been more important. It's so important, in fact, that doing so gives you all of the competitive advantages described here. You have to strike the right balance between addressing your specific needs and not reinventing wheels, and a comprehensive developer toolbox is critical for doing so.

Going back to the day to day life examples, think about the so-called agile house. It would seem silly to cobble a house together one room at a time, with different pipes, electrical fittings, and safety standards. In fact, that would seem crazy. Similarly, in 5 or 10 years, we'll look at the idea of working without a rich development toolbox. It will seem crazy to try to get by without one.

Get Started Today

You can start your experience with DevCraft bundles today. Get a free trial of DevCraft and don’t forget that the free trial comes with free support.

Start Your Free Trial

Top 10 Funny Software Development Tweets that Broke the Internet in 2017

$
0
0

Check out the top 10 funniest tweets about software development from the last year. Think we missed one? Let us know in the comments.

As I compiled the Top 10 Web Development tweets and Top 10 .NET related tweets, I stumbled upon some real gems related to software development. I got quite a kick out of them, and they were so popular that they kinda dwarfed anything specific framework related – be it .NET, JavaScript, Angular, React, Vue etc. So, here comes the 10 most popular software development tweets that set Twitter on fire. Again, I could have missed some insanely popular tweet, so please drop me a line in comments below with link to it.

Let us know what you think—use the chance to vote on the best ones below by giving them a thumbs up or down.

Enjoy!


10. fiona

9. I am Developer

8. The Practical Dev

7. Melanie Ehrenkranz

6. Victor Porof

5. SwiftOnSecurity

4. Ryan Stortz

3. Computer Facts

2.The Practical Dev

1. RVagg


And while I got you here – if you are interested where we think .NET is going, please check out The State of .NET in 2018 that  John Bristowe, Sam Basu and Ed Charbeneau put together for your year-end fun reading.

Check Out The State of .NET in 2018

Lastly, honorable mentions go to @Nick_Carver for his tweet which didn’t make this list (came at #12).  Theoretically, it could have fit into the top-10 JavaScript tweets top list, but I disqualified it from there as it was poking fun at JavaScript devs  . Also, shout out to @thomasfuchs whom I removed for poking fun at JavaScript too – just trying to keep things clean fun, right.  

Lastly, massive shout out to @codepo8 from whose feed we found a ton useful tweets for the top 10 list!

What Developers Were Fired Up About In 2017: Top 5 .NET Blogs

$
0
0

Find out the top 5 articles developers read on .NET in 2017—rest assured, each one is worth a read.

Looking back at the most read .NET articles on our blogs in 2017 is telling, and you can learn a lot about the topics developers were most interested in this year. The following .NET articles have all been read over 10,000 times. Some posts spawned intense discussion, and many reverberated around the Internet, shared by fellow developers on social media or reposted in community websites and newsletters.

Have you missed any of this top content?:

#5: The New Configuration Model in ASP.NET Core

by Julio Avellaneda 

Say goodbye to web.config, hello to appsettings.json and learn about the new configuration model introduced in APS.NET Core compared with previous versions of ASP.NET. Julio’s a real fan of this new model, “It works with XML, it works with JSON, INI and any other file type you may need. Lastly, it is very customizable and is built with dependency injection in mind.”

#4: Telerik UI for UWP Now Open Source

by Dobrin Grancharov

The open-sourcing of Telerik UI for Universal Windows Platform under the Apache Software License was good news for the .NET community. Dobrin gives the full story in his blog, explaining what Telerik UI for UWP is, why we decided to open-source it and how to get it (for free). No less exciting was the news that a little later Telerik UI for UWP joined the .NET Foundation.

#3: Build and Deploy Your ASP.NET Core Application with Apache

by Jeff Fritz

You can’t get any more authoritative information than this, can you? In this article, Jeff Fritz answers the question, “Why should we consider building applications with a framework that has so much baggage behind it and try it on Linux, somewhere [Microsoft] have traditionally shunned?” and demonstrates the steps to build and deploy to a Linux server running Apache through a simple demo app.

#2: It’s a Good Day to Be a C# Developer

by Kevin Griffin

Why wouldn’t it be? In this article, Kevin touches upon several aspects of the life of the C# developer to attempt an answer to the question, “Should I learn C#?” and “How does C# compare to other popular languages such as JavaScript, Java, Python, etc.?” Yes, there was a heated discussion in the comments – don’t miss out on it.

#1: The .NET Core 2 Wave

by Ed Charbeneau 

We’re in the enviable position of being able to look back on the predictions made in Ed’s conversation with Scott Hunter, Director of Program Management for the .NET Platform from the future. We can now judge whether opening with “Will 2017 be the year of .NET Core? Of course it will!” was justified. And if you’re not feeling all that judgmental, just read this enjoyable conversation and see what the perception was about .NET Core 2, .NET Standard 2.0 and Visual Studio 2017 at the beginning of the year!

#1 .NET long-form content: The State of C#

Our most popular .NET whitepaper for 2017 was The State of C# by Kevin Griffin. It provides an overview of what’s new in C# 7.0 and considers a number of important questions such as: “Is C# a viable tool to have in my toolbox?” and “What’s coming in the future for C#?”

Thank you for reading so far! Have you seen what the top 5 JavaScript articles of 2017 were yet? Lastly, coming up next you can finish this enriching trip with the top 5 industry trends articles of the year for a wide-angle lens finale.


What Developers Were Fired Up About In 2017: Top 5 Blogs on Industry Trends

$
0
0

Find out the top 5 articles developers read on a range of development topics in 2017—we can assure you that each one is worth a read.

Looking back at the most read articles on our blogs in 2017 is telling, and you can about the topics developers were most interested in this year. The following articles, covering a range of development topics, have all been read over 10,000 times. Some spawned intense discussion, others reverberated around the Internet, shared by fellow developers on social media, or reposted in community websites and newsletters.

If you're interested in this industry, you'll want to check out some of our top content. Let’s see if there’s any you’ve missed:

#5: Cooking with ASP.NET Core and Angular

by Ed Charbeneau 

Ed guides the reader into getting started with Angular using ASP.NET Core by following a simple recipe with clearly defined ingredients. “We'll start by walking through all of the ingredients necessary to make a successful project. Next we'll follow the recipe, learning where each ingredient fits. Finally, the application will be fully baked and ready to serve with all of its cutting edge goodness.” Et voilà!

#4: 5 CSS Properties That You Probably Don’t Know

by Annarita Tranfici

Annarita covers 5 not-so-popular CSS properties she finds very interesting. She gives an overview of what they are, which values you can use and their use cases. The CSS properties she covers are related to writing display (font-display and writing-mode), rendering performance improvements (contain and will-change properties) and creation of new, fancy designs (clip-path).

#3: 5 Features to Watch in Visual Studio 2017

by Scott Addie

Scott raises awareness of some landmark features and improvements in Visual Studio 2017. The intent is to graze the surface of what's possible in this release, focusing on the following topics: live unit testing, code style configuration, .NET Core migration tooling for project.json/XPROJ, Bower & npm package, restore settings and the refreshed JavaScript editor.

#2: Introducing Fiddler for OS X Beta 1

by Tsviatko Yovtchev

The announcements for the Fiddler for OS X and Linux Beta releases were both big news for the Fiddler community, but this year there’s something even bigger: the need for separate platform versions is becoming obsolete. Now there is Fiddler Orchestra, a new flavor of the famous web debugger that delivers the benefits of remote debugging and platform-agnostic web UI. If you thought the OS X and Linux releases were cool, better head to FiddlerCore for .NET Standard and Fiddler Orchestra—the Future of Fiddler for the latest major Fiddler release!

#1: What is a Hybrid Mobile App?

by John Bristowe

John did a fantastic job of answering some of the most frequently asked questions about hybrid apps, such as: "How are hybrid mobile apps built?", "What are the motivations to go hybrid?", "When should you build a hybrid mobile app?" and "Who is building hybrid apps?".

Thank you for reading so far! Have you seen what the top 5 JavaScript and top 5 .NET articles were yet? Check them out and let us know what you think.

5 .NET Standard Features You Shouldn’t Miss

$
0
0
Banner photo by Bridget Coila modified by Ed Charbeneau

It’s amazing to see the .NET community with so much energy, can you believe there’s a C# Advent Calendar? That means there’s 25 (including this one) all new articles for the month of December!

As the .NET ecosystem moves at record speed these days, it's easy to overlook some amazing things happening in this space. There are constantly new tools and features being released that can easily increase productivity. Let's take a look at a few features Microsoft recently shipped that help with testing, front-end development and cross-platform migrations.

InMemory Database Provider for Entity Framework Core

Entity Framework (EF) Core now targets .NET Standard 2.0, which means it can work with libraries that implement .NET Standard 2.0. While EF boasts many new features, the InMemory database provider is one that shouldn't go unnoticed. This database provider allows Entity Framework Core to be used with an in-memory database and was designed for testing purposes.

The InMemory provider is useful when testing a service that performs operations using a DbContext to connect with a SQL Server database. Since the DbContext can be swapped with one using the InMemory database provider, we can avoid elaborate test setups, code modification or test doubles. Even though it is explicitly designed for testing, the InMemory provider also makes short work of demos, prototypes, and other non-production sample projects.

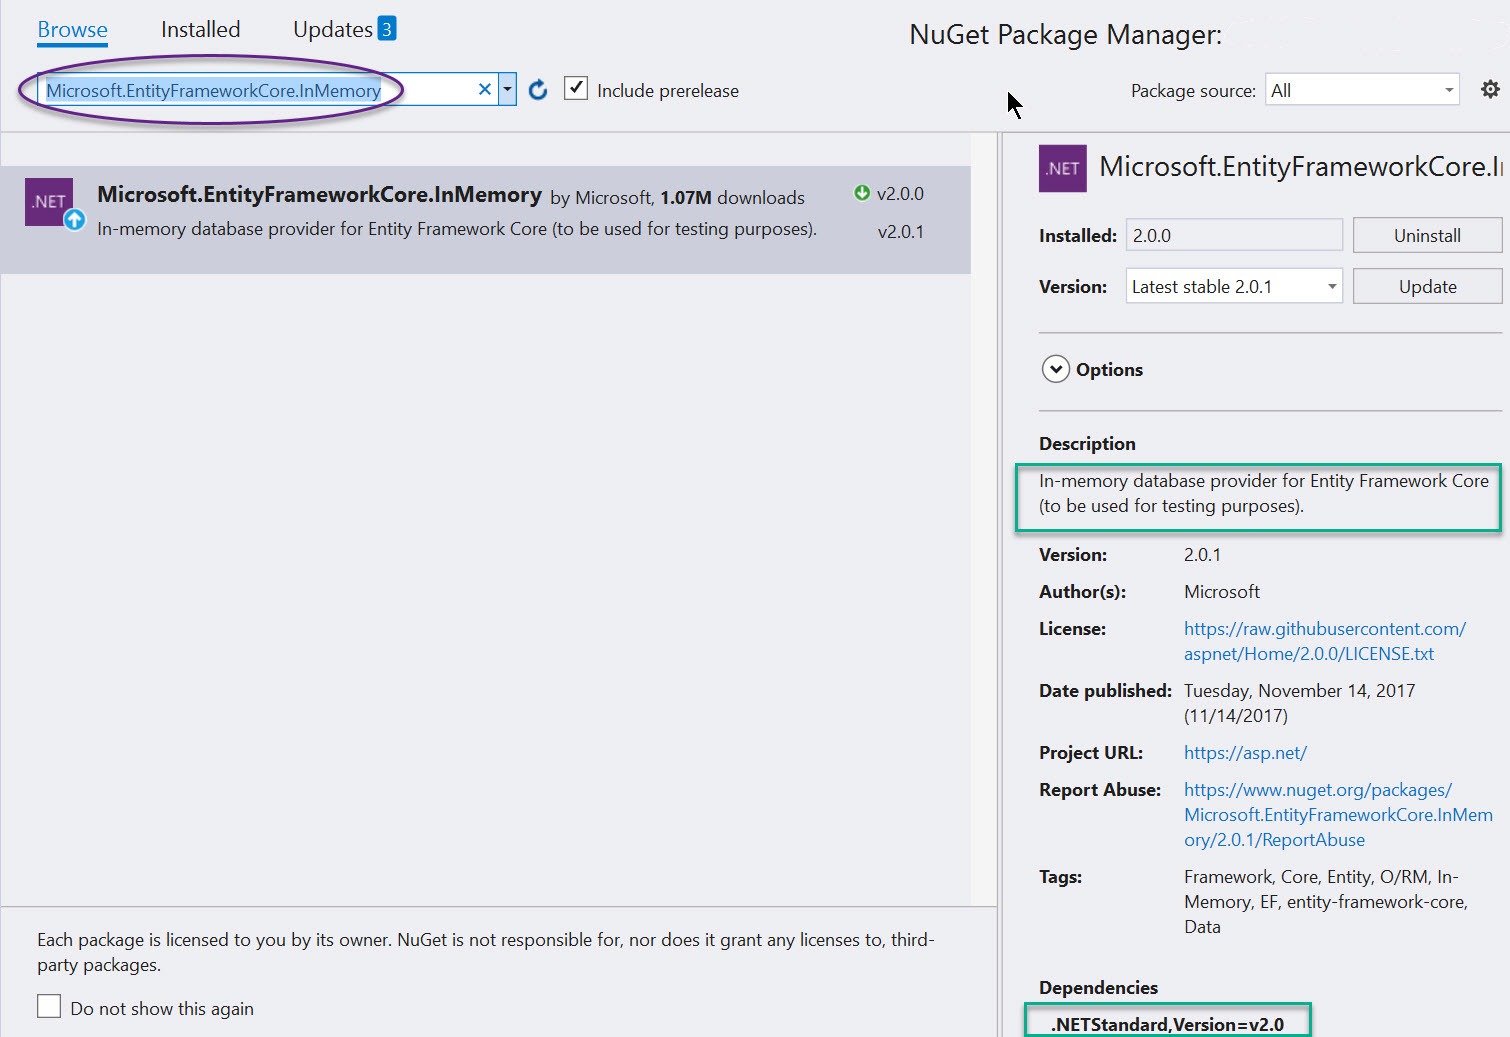
The InMemory provider can be added to a project using NuGet by installing the Microsoft.EntityFrameworkCore.InMemory package.

Package manager console:

PM> Install-Package Microsoft.EntityFrameworkCore.InMemory -Version 2.0.1 NET Core CLI: $ dotnet add package Microsoft.EntityFrameworkCore.InMemory Visual Studio NuGet Package Manager:


InMemory-NuGet

Once the InMemory provider is set up, we'll need to add a constructor to our DbContext that accepts a DbContextOptions object. The DbContextOptions object will allow us to specify the InMemory provider via configuration, thus allowing us to swap the provider as needed.

public class BloggingContext : DbContext
{
    public BloggingContext()
    { }

    public BloggingContext(DbContextOptions<BloggingContext> options)
        : base(options)
    { }
}
With the our DbContext implementation in place, we're able to then create a new instance of the context. Calling the UseInMemoryDatabase extension method configures the context to connect to an in-memory database. Once the database connection is established, we can seed it with data and run our tests.

[TestMethod]
public void Find_searches_url()
{
    var options = new DbContextOptionsBuilder<BloggingContext>()
        .UseInMemoryDatabase(databaseName: "Find_searches_url")
        .Options;

    // Insert seed data into the database using one instance of the context
    using (var context = new BloggingContext(options))
    {
        context.Blogs.Add(new Blog { Url = "http://sample.com/cats" });
        context.Blogs.Add(new Blog { Url = "http://sample.com/catfish" });
        context.Blogs.Add(new Blog { Url = "http://sample.com/dogs" });
        context.SaveChanges();
    }

    // Use a clean instance of the context to run the test
    using (var context = new BloggingContext(options))
    {
        var service = new BlogService(context);
        var result = service.Find("cat");
        Assert.AreEqual(2, result.Count());
    }
}


The InMemory provider is easy to setup, and offers low friction for testing business logic using EF. Additionally, since the database is in-memory, the data will not persist once the application restarts, providing a clean slate for each test run or demo. Despite being for "testing purposes only" it's extremely useful for creating and sharing demo code as no actual instances of SQL server are required, yet you can still utilize basic functionality of EF.

xUnit Test Projects

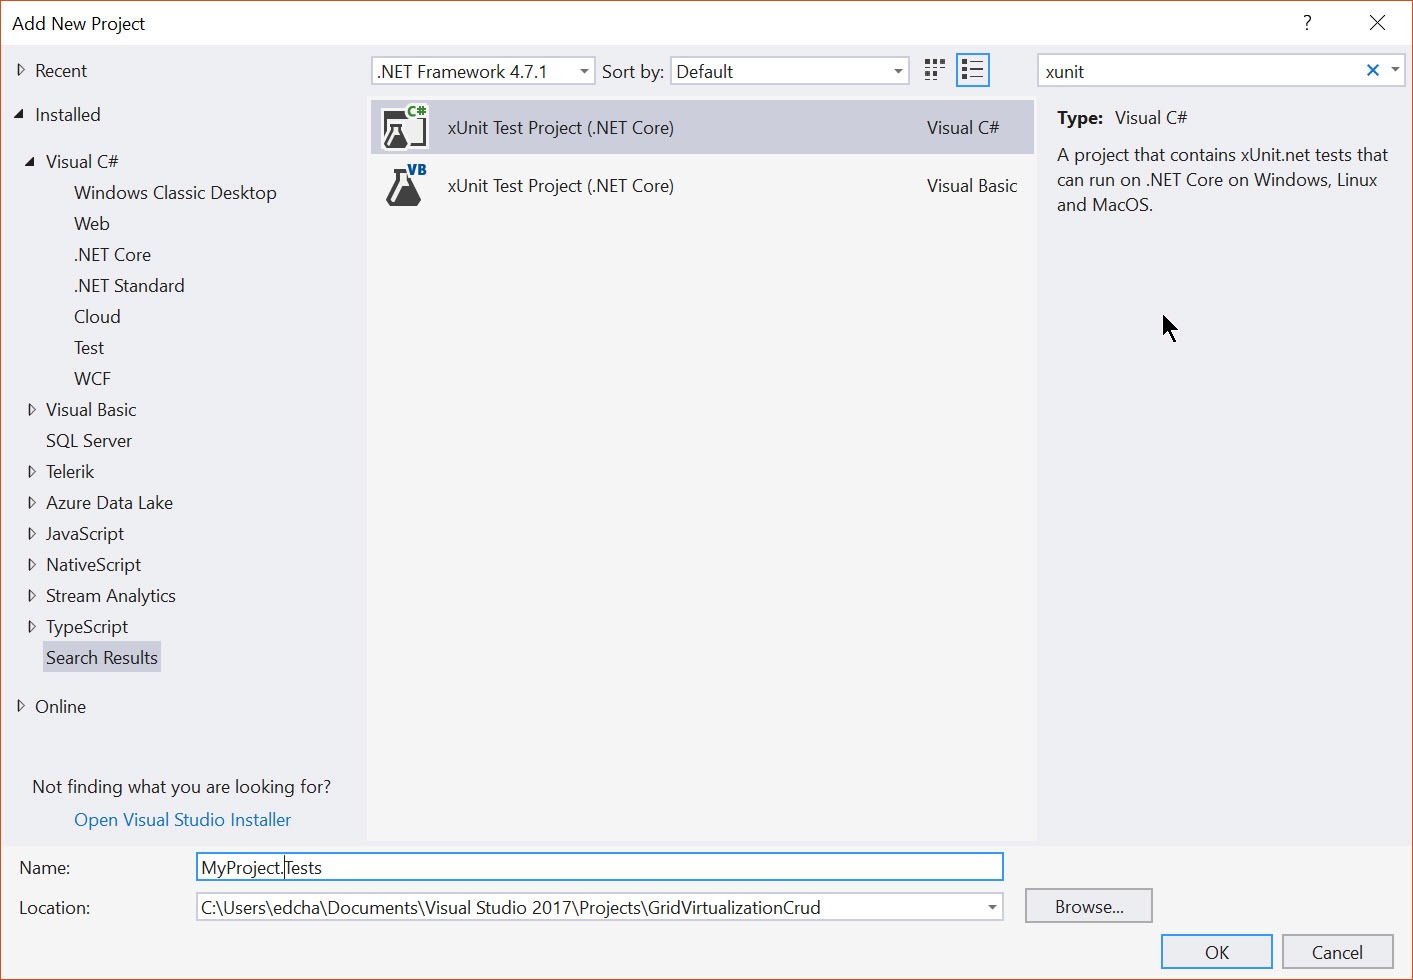
With over 10 million downloads according to NuGet.org, xUnit is quite a popular unit testing framework for .NET. If you're writing a .NET Core 2.0 application, then take advantage of the xUnit project template. The xUnit project template is included with .NET Core 2.0 to easily kick-start unit test projects from the .NET Core CLI or Visual Studio. While setting up xUnit has always been as simple as adding a few package references, the new project template reduces the process to a single click (or command). .NET Core CLI: $ dotnet new xunit From Visual Studio: File > New (or Add) > Project

xunit-test-project 

The new project is initialized with all the necessary dependencies. In addition, it works seamlessly with Visual Stuido 2017 Test Runner Explorer and supports Life Unit Testing in VS2017 Enterprise Edition.

Angular & React Templates

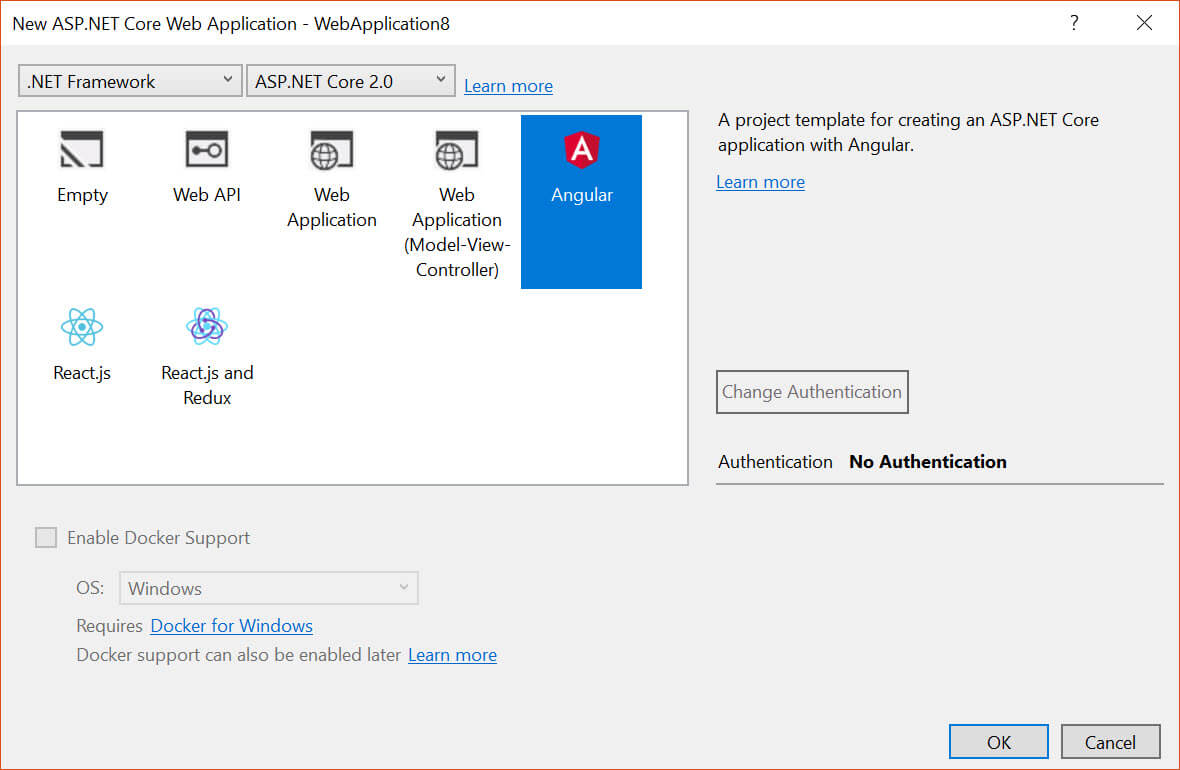
With the 2.0 release of .NET Standard and .NET Core, new project templates were added for JavaScript Single Page Applications, or SPAs. These new project templates utilize a library called JavaScript Services. JavaScript Services is a set of technologies for ASP.NET Core developers built by the ASP.NET team. It provides infrastructure that you'll find useful if you use Angular/React/Knockout/etc. on the client. If you build your client-side resources using Webpack , or if you otherwise want to execute JavaScript on the server at runtime, then there is support in the library to perform those tasks as well. JavaScript Services is the underlying core functionality for the Angular and React project templates.

The Angular and React templates are quick-start solutions that include Webpack, ASP.NET Core and TypeScript. The templates are configured to work out-of-the-box so developers who are less experienced with these technologies can jump right in and start working. These are also great solutions for getting an application bootstrapped without needing to build the complex tech stacks by hand. JavaScript Services is responsible for this ease-of-use as Webpack abstractions are built into the template, thus reducing the learning curve.

Since the templates are included in the ASP.NET Core 2.0 release, no additional installation steps are required.

Using the templates is as straight forward as executing the .NET Core CLI or clicking File > New > Project from Visual Studio 2017.

.NET Core CLI: $ dotnet new templateName [angular, react, reactredux] From Visual Studio 2017

angualr-dotnet-template


What we’re getting from the template is a highly opinionated setup where many of the nuances required to initialize a project are planned out for us. This means that Webpack is configured to deal with vendor dependencies and server-side rendering. Included in the setup are processes to kick off the actual tooling, such that Webpack is initialized from within the ASP.NET application at start up. In addition, Hot Module Reload (HMR) is triggered from the application's middleware, thereby further automating the development process.

npm Task Runner

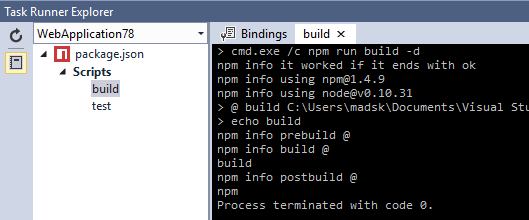
When using the Angular and React templates, a lot of time will be spent on the command line with npm. Since many of us enjoy working from Visual Studio it can be disruptive to keep switching to a command line window to perform tasks. This is where the npm Task Runner comes in handy as it adds support for npm scripts defined in package.json directly in Visual Studio's Task Runner Explorer. This includes full support for Yarn as well.

npm-task-runner 

It's a must-have for any developer working with npm from Visual Studio, so grab it from the Visual Studio Market Place.

Windows Compatibility Pack for .NET Core

.NET Core 2.0 is a milestone release for backwards compatibility. With .NET Core & Standard 2.0, there's little need to worry about legacy code. If there's one thing Microsoft understands well it's that existing applications need a low friction upgrade path. There are several attributes to .NET Core that make it well suited to transition to from legacy code. Because .NET Standard 2.0 is at near API parity with .NET Framework 4.6.1, applications can make use of code they already know. In addition, .NET Core includes a compatibility shim that allows projects to reference existing .NET Framework NuGet packages and projects. This means most packages on NuGet today are already compatible with .NET Core 2.0 without the need to be recompiled.

With .NET Core being cross platform there are some instances where APIs are only available on Windows. For this reason, the APIs are not available in .NET Core. For example, Linux does not have the Windows Registry, therefore Microsoft.Win32.Registry isn't available in .NET Core. This might pose a problem for the migration of applications from .NET Framework to .NET Core. To overcome this issue Microsoft has released the Windows Compatibility Pack for .NET Core (currently in preview).

The Windows Compatibility Pack, provides access to an additional 20,000 APIs missing from .NET Core. The Windows Compatibility Pack bridges the gap, allowing those APIs to run with .NET Core when the application is running on Windows. Having the ability to migrate existing applications to the next generation gives .NET developers the freedom to write future-proof code and move the business forward with minimal risk. Microsoft suggests the following migration steps in order to smoothly transition to other platforms.

  1. Migrate to ASP.NET Core (while still targeting the .NET Framework)
  2. Migrate to .NET Core (while staying on Windows)
  3. Migrate to Linux
  4. Migrate to Azure

API Analyzer

If you plan on porting an application to Linux, it's important to be aware that not all APIs are supported equally on all platforms. When using .NET Core with the Windows Compatibility Pack, it's possible to call an API that is not supported from an application running on Linux. The result would be the dreaded PlatformNotSupportedException being thrown. This can make development a bit tedious and would require frequent trips to documentation to ensure that a particular API is available to use across platforms.

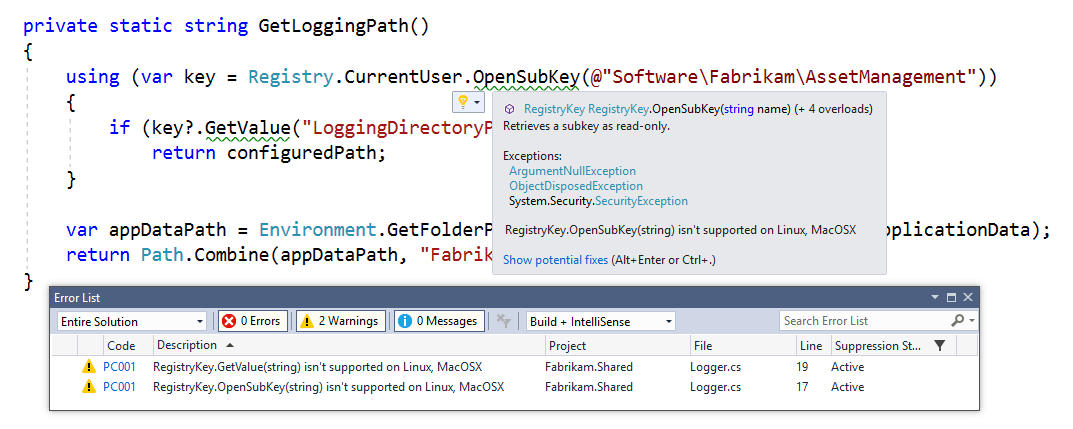
To make things much easier Microsoft has released the API Analyzer tool, a tool to perform these checks automatically. The API Analyzer is a Roslyn-based analyzer that will flag usages of Windows-only APIs when you’re targeting .NET Core and .NET Standard.

Using the API Analyzer, warning messages are presented letting us know that an API isn't supported, for example: isn't supported on Linux, MacOSX. api-analyzer
When a warning is encountered, we can now take action against it by removing the feature, replacing it with one that is cross-platform or providing an alternate code path for each operating system.

When developing for a cross-platform and multi-device world, tools like the API analyzer are not only time savers but absolute necessities.

The State of .NET

The aforementioned features are just a glimpse into a much bigger picture of how .NET Standard is shaping the ecosystem. If you would like to learn more about the new capabilities of .NET; including fundamental improvements and standardization efforts that bring forth the best ideas for modern .NET development, then check out our latest whitepaper, The State of .NET in 2018. You can also hear more about these features directly from the .NET Standard documentation team's very own Maira Wenzel on the latest episode of the Eat Sleep Code podcast.

Fluent Theme for WPF & WinForms Apps Are Coming in 2018

$
0
0

As of our next release on January 17th 2018, we will be adding a Fluent Inspired Theme to both Telerik UI for WPF and Telerik UI for WinForms suites. Read on what you can expect to see after it drops live.

Back in May 2017 at Build, Microsoft announced the Fluent Design System with a promise to bring a more intuitive and easy-to-use interface on top of overhauling the visual appearance across apps and services running on Windows, iOS and Android. The new design system is the successor to Microsoft’s Metro design, which has been around for a while already, and will be focusing on light, motion, material and scale elements to make interactions more coherent with the user interface. 

One of the first apps that got brushed up by utilizing Fluent Design was Windows’ very own web browser—Edge. And that was just one of the many additions presented in the Windows 10 Fall Creators Update

“So far, so good. But Dobrin, I am building apps with WinForms and WPF, so what’s in it for me?” you may be asking.

Well, as you probably already know, we have a long history of building UI elements for .NET-based applications, with WinForms and WPF being at the center of it all. Since we first released the Material theme to both WPF and WinForms back in the beginning of 2017, we've been pondering what the next big design framework to hit the market will be. It did not take long before Fluent was announced, and we've been hard at work incorporating it ever since.

Fresh and Modern Look in Your Desktop Application

That said, as of our next release (R1 2018, which comes on January 17), we will be adding a Fluent Inspired Theme to both Telerik UI for WPF and Telerik UI for WinForms suites. The new theme will spread and is available across all controls, and will interpret all aspects of the design system by playing around with light, motion and other elements. It will deliver a compact and truly modern look to your desktop applications, that will allow them to fit right in the contemporary appearance of the Windows operating system.

Check out the teaser screenshots below for some examples.

Blog1Telerik

Telerik UI for WPF and WinForms - Fluent theme - Spark Image

The theme is also fully customizable through the WinForms Visual Style Builder and WPF Color Theme generator, making it very easy to get the exact look and feel you are aiming for in your desktop applications. It comes ready to use out of the box with beautiful visuals and colors, but at the same time with all the features traditionally found in our themes to make the development of your applications as easy and as flexible as possible.

Let's Fluentize!

Telerik UI for WPF and WinForms Fluent Theme - Scheduler Image

All the controls from both WinForms and WPF suites will get the makeover, with light interaction feedback, tidy flat interfaces and vibrant color schemes. We have taken inspiration from the Fluent design system and have implemented it in the best way possible for each of the respective platforms, with care to the tiniest detail in each of our components.

Telerik UI for WPF and WinForms - Fluent Calculator Image

Closing Words

How do you feel about Fluent Design coming to WPF and WinForms applications? Hope you all are as excited as we are with the news, and we can’t wait for you to try it out after the R1 2018 release. In the meantime, should you have any questions or comments, we want to hear from you—do share them in the comment section below, our social media channels or through our feedback portal.

Breaking Down WPF Grid View vs. Virtual Grid

$
0
0

With the official release of the Virtual Grid control for Telerik UI for WPF, let's take a moment to talk about when VirtualGrid is the best choice for a project and how it differs from GridView in UI for WPF.

Grid View vs Virtual Grid

Telerik UI for WPF’s RadGridView control is one of the best grid components for WPF applications on the market. It is very feature rich, easy to setup and does all the data shaping for you. It covers almost every grid scenario that you may have for your application needs.

At the same time, every now and then we face cases where our users want to display very large amounts of data in a grid control. I mean very large. Typically, as RadGridView creates the data model and handles all the data for you, it has all that data loaded in memory where it performs the different data manipulations. While this is a suitable approach for a couple million rows, if you have a gazillion data records, it may no longer be the most optimal way.

This is where RadVirtualGrid comes into play, as it allows you to fetch only the data that is needed and only when it is needed. This way, you get fine-grained control on what and when to fetch and how to shape it, resulting in a memory footprint that is very small.

Telerik UI for WPF Virtual Grid Performance

Another great benefit of RadVirtualGrid is its rendering mechanism. Instead of adding its elements to the visual tree, its rendering logic builds whole render blocks for displaying the data. The API exposes functionalities through which the developer can map the visualized data to the underlying data source. 

Now that we know the general differences, let me expand a little bit on them. There are two approaches to choose from with RadVirtualGrid, depending on the specific requirements.

Using the Built-In DataProvider

The first one is to use the DataProvider mechanism. It is quite similar to the data engine that RadGridView utilizes. It is suitable for MVVM scenarios and requires less effort when switching from RadGridView to RadVirtualGrid: see this documentation on the matter. Note that in case the DataProvider is utilized, all data will be loaded in memory, just like with RadGridView, but you will still gain the rendering boost. And this boost can go up to 10x faster initial loading and rendering.

Using Load on Demand

The other approach is to use the events exposed for populating data on demand when loading data in the viewport. In this case, the mapping between the data visualization and the data source is entirely in your hands. This is the faster approach as the control is aware only of the items present in the viewport. This will also result in very low memory consumption compared to RadGridView, as the control would not load all the data in memory.

The two controls share the same UI regarding performing selection, filtering and sorting. On the other hand, there are some differences when programmatically utilizing these functionalities. Performing the other operations that RadVirtualGrid supports, such as editing, pinned rows and columns, etc. also have differences compared to RadGridView. Put briefly, part of the concept of RadVirtualGrid is that it exposes events that are raised when “something is needed.” This is valid for populating data, applying headers and setting editors, for example.

Of course, there are various methods and properties available for the other functionalities supported by the control, such as scrolling, pinning rows and columns, row and column alternation, etc.

For example, below is a possible implementation of the CellValueNeeded event handler:

private void virtualGrid_CellValueNeeded(object sender,
           Telerik.Windows.Controls.VirtualGrid.CellValueEventArgs e)
        {
            if (e.ColumnIndex == 0)
            {
                e.Value = String.Format("{0}", Club.GetClubs().ElementAt(e.RowIndex).Name);
            }
            else if (e.ColumnIndex == 1)
            {
                e.Value = String.Format("{0}", Club.GetClubs().ElementAt(e.RowIndex).Established);
            }
            else
            {
                e.Value = String.Format("{0}", Club.GetClubs().ElementAt(e.RowIndex).StadiumCapacity);
            }
        }

A similar approach can be used when the editors or headers of the controls are needed, for example. Check out these resources on the matter: Editing and Headers

There are also some differences regarding the functionalities that the two components support. One of the most commonly used mechanisms of RadGridView is the ability to define customized columns. For the time being, such support is not available for RadVirtualGrid as this will affect its overall performance. Also, RadVirtualGrid does not provide an API for populating hierarchical data and does not support grouping operations.

Closing Words and Next Steps

I hope that this article sheds some light on the difference between the GridView and VirtualGrid components available in Telerik UI for WPF. If you haven’t tried the Virtual Grid already, make sure to get the latest version of the suite and try it our for yourself.

Download Telerik UI for WPF

Let us know how your experience went and feel free to reach out to the product team through the feedback portal.

Barcode Control Coming to Telerik UI for WinForms in 2018

$
0
0

We are happy to announce that in our next release on January 17th 2018, we will be adding a new control to the Telerik UI for WinForms Suite – The BarCode control. 
Telerik UI for WinForms - BarCode Qr Overview image

A lot of you have shared that your projects requirements involve the ability to generate codes inside the application, which is common in retail, manufacturing, warehousing, shipping, healthcare and other business apps. With the new BarCode control you and your end users will be able to easily create barcodes in various formats from QR, Codabar, Code 25, Code 129, EAN 13 and more. Check out the examples below:

Code Format

Example Barcode

QRQRCode(TelerikDotCom) 
 Codabar Codabar
 Code25 Code25Standard
 Code 128 Code128
 EAN 13 EAN13
 Postnet Postnet
Code 93  Code93Extended
 UPCA UPCA


The Barcode control, alongside a Fluent Design theme and more are coming to Telerik UI for WinForms in the next release, so make sure to get the latest version of the suite on January 17th.

For an in-depth review of all the new stuff coming with the release across desktop, web and mobile, join us on the 30th of January for the Telerik R1 2018 Release Webinar.

Sneak Peek: Internationalization & More in Telerik Reporting R1 2018

$
0
0

We have lots of great features coming to Telerik Reporting in our next release. Read on to get an early preview.

For R1 2018 we are busy implementing a pack of new features that you have requested on our feedback portal. In the next release, we will include the latest accessibility standards for our desktop report viewers, integrated DataDirect ODBC Drivers with Engine Data Retrieval, and enable the Standalone Report Designer for localization.

In this blog post, I want to focus on what to expect regarding that last new feature.

Standalone Report Designer Internationalization

report designer with pie chart and table

Application internationalization involves improving the experience, and decreasing the learning curve, for all non-native English speakers. In this release, we are working on providing resource files to enable our customers to localize the report designer according to their requirements.

The string resources will include keys for all UI areas. This includes all backstage items, ribbon items, wizards, properties descriptions, enum values and even property names. The localization mechanism is as simple as providing the resource files in the Standalone Report Designer directory. After a restart, the resource files are loaded and the localized strings are used in the designer UI. Which resources are loaded depends on the OS language or on the explicit preference set in the designer settings.

Next Release Coming Soon

The release is scheduled to arrive in less than a month in January. Hope you guys are as excited as we are with the news, and we can’t wait for you to try it out.

How do you feel about the Telerik Reporting new features? As we prepare them for the next release, should you have any questions or comments, do share them in the comment section below, our social media channels, or through our Feedback Portal.

Sneak Peak of JustMock R1 2018: TFS Web Based Builds

$
0
0

Check out this sneak peek into what is coming in the next release of JustMock.

TFS Web-based Builds

As Microsoft began to strech beyond the .NET/Windows world into the Mac, Linux, etc., the Windows Workflow approach proved not to be the best way for creating builds. With the introduction of TFS 2015 a new simpler, cross-platform pipeline/task model was presented as a new way to define builds – namely Web-based builds.

It is important to note, that with TFS 2018 the XAML builds are no longer supported. More information is available on this MSDN blog post.

JustMock and Web-Based Builds

I am happy to inform you that with the R1 2018 release, you’ll be able to use the newly introduced JustMock VSTest build task to execute tests that are mocked with JustMock on your build machine.  

tfs builds

Stay tuned for more details on this soon after the official release on Januarty 17th.

For an in-depth review of all the new stuff coming with the release across desktop, web and mobile, join us on the 30th of January for the Telerik R1 2018 Release Webinar.

Try JustMock Today

If you don’t have the latest version of Telerik JustMock, you can download it here.

Download Telerik JustMock

Let us know how your experience went and feel free to reach out with comments or suggestions through the JustMock feedback portal.


Sneak Peek: Telerik and Kendo UI R1 2018

$
0
0

Every app deserves a sleek design. Learn more about the latest updates to our Telerik and Kendo UI tools that will help you deliver outstanding apps.

At Progress, we believe that every app deserves a sleek design; one that not only is pleasing to the eye, but easy to navigate. We believe all developers should say “no” to ugly apps and create visually appealing apps with outstanding UX.

But we’re also realists and understand that not every team has the expertise nor every developer the time needed to build that kind of UI. That’s why our developer tools – Telerik and Kendo UI – were created. They were born out of the desire to make the world a better place, one eye-pleasing, easy-to-use-app at a time.

It was with that in mind that we embarked on building out the latest major release of our controls, the soon to be released R1 2018. On January 17, we will continue to help you say “no” to ugly apps with new features and functionality added to each suite and continued enhancements to our overall quality. Over the next few weeks, we will share more details of what you will see in the next release through the blogs. In the meantime, here are a few highlights:

Tried DevCraft?

While you’re anxiously awaiting Jan 17 so you can start playing with the cool new features and functionality, make sure you’ve downloaded a trial or purchased a DevCraft bundle. DevCraft gives you access to all of the toolsets, allowing you to say “no” to ugly apps for the desktop, web, or mobile.

Register for the Webinars

And don't forget to mark your calendars for our release webinars, where our technical experts will provide a deep dive into all of our new features and functionalities. Register today for the Telerik webinar (Jan 30th at 11:00 a.m. ET) and the Kendo UI webinar (Feb 1 at 11:00 a.m. ET). 

Register for the Telerik Release Webinar

Register for the Kendo UI Release Webinar

Sneak Peek of Telerik UI for Xamarin R1 2018: New Controls & Design-Time Support

$
0
0

The first major Telerik and Kendo UI releases of the year are almost here. In R1 2018, Telerik UI for Xamarin will see five new controls & design-time support. 

As you may have heard, we plan to kick off 2018 in style with a major release of our tools. We’re enabling developers everywhere, regardless of skill level, to say “no” to ugly apps. 

While I am excited about the features and functionalities we will be releasing in R1 2018 for all our products on January 17, the Telerik UI for Xamarin release has me on tenterhooks. I can’t wait for you guys to get your mitts on it. We’re releasing five controls and design-time support. Can you say awesome?

Here’s a brief overview of each: 

Design-Time Support – Toolbox Support

Telerik UI for Xamarin enhances the design time experience with support for Toolbox by allowing you to drag and drop components on the screen, thus making the screens development much easier. 

New Button and ImageButton Controls

With the R1 2018 release, developers get two new button controls. We are introducing a new button control that supports our theming mechanism, making it easier to setup and customize this essential piece of UI. Additionally, we will release the ImageButton control, which allows you to easily create a button with any shape that contains an image. 

New NumericInput Control

RadNumericInput Control

In R1 2018 we are releasing the NumericInput control. This new control allows developers to easily take numeric input from their users with a convenient UI, tailored for each of the target platforms – iOS, Android, UWP. The NumericInput control features easy layout adjustments of the elements (e.g. setting the position of the +/- button), min/max value restrictions and theming support (click image on the right to see it in action). 

The Grid Component is Now RTM

The previously released Grid component under CTP is ready for prime time in R1 2018. It is greatly improved and packed with new features such as built-in grouping and filtering UI, load on demand and localization support.  

New RadEntry Control

RadEntry is a text box control which accepts a string input from the users. In R1 2018 we will enable standard entry control features such as set and read text, keyboard entry, text color and alignment, as well as border customization options.

Remember, if you have a DevCraft bundle, that now comes with Telerik UI for Xamarin. If you don’t have a bundle or the product yourself, make sure you download a trial today. And don't forget to register for the Jan 30th Progress Telerik R1 2018 webinar where our technical experts will dive deeper into all of the new features and functionalities that are a part of R1 2018.

Try DevCraft
Register for the Webinar

Sneak Peek: Telerik UI for ASP.NET AJAX R1 2018

$
0
0

What do you add to a toolset that already has everything? Read on to learn what will be included in Telerik UI for ASP.NET AJAX in R1 2018.

It’s no secret. Telerik UI for ASP.NET AJAX is one of our most mature toolsets. It’s where we got our start and, if for no other reason, will always have a special place in our hearts. While there aren’t many other controls we could add to the suite, we are continuously looking for new ways to improve the set of more than 100 controls.

As you might have heard, we have our 2018 R1 release coming up this month on January 17th. The new release features enable developers everywhere, regardless of skill level to say “no” to ugly apps and create highly functional apps with a sleek design and modern UX.

So what do you add to a toolset that is already complete? How about accessibility and stability enhancements?

Here are a few of the highlights of what will be included in R1 2018 for Telerik UI for ASP.NET AJAX:

Accessibility

In accordance with the WCAG 2.0 and Section 508 standards, Progress continues to ensure its Telerik UI for ASP.NET AJAX toolset is in compliance. In R1 2018, Telerik UI for ASP.NET AJAX is releasing further enhancements to the RadMenu, DatePicker, Pageview, Spreadsheet, and MasterTableView to enable ARIA support and ensure compliance.

Stability

Progress is dedicated to continuously enhancing and improving the Telerik UI for ASP.NET AJAX toolset. To this end, with R1 2018 we have improved browser compliance with support for the latest editions of all major browsers along with several regression issues around browser support. On top of this we have resolved a variety of high priority issues (more than 20) and bugs logged in our system to ensure that UI for ASP.NET AJAX users can enjoy an incredibly stable product.

Updates Across ASP.NET

If you are playing with or trying out different flavors of ASP.NET, make sure you look at what’s coming out for Telerik UI for ASP.NET MVC and Telerik UI for ASP.NET Core. You can download trials for all of them today, too.

Learn More at the Webinar

And don’t forget (not that we’ll let you), the official release date is January 17. Make sure you sign up for the Telerik release webinar (January 30 at 11 am ET) and watch your inbox for additional information about what to expect in R1 and beyond.

Sneak Peek: Telerik ASP.NET MVC and Core Offerings in R1 2018

$
0
0

In this post, we'll show you a quick preview of what's coming in the first major release of the year for Telerik UI for ASP.NET MVC and Telerik UI for ASP.NET Core.

If you can’t tell, we have release on our brains. January 17th is just around the corner and that’s the day we will give you all sorts of new features and functionality in all of the Telerik and Kendo UI toolsets. The new release items enable developers everywhere, regardless of skill level to say “no” to ugly apps and create highly functional apps with a sleek design and modern UX.

What's New

So what will be coming in Telerik UI for ASP.NET MVC and Telerik UI for ASP.NET Core? For starters of course we've resolved issues and bugs, but there is much more to come on January 17th. Here are the highlights.

Batch Processing

As part of the R1 2018 release, we will deliver support for batch processing in OData v4 for both suites.

Tag Helpers

In Telerik UI for ASP.NET Core, we will also be adding new Tag Helpers—including the Chart component, Gauges, MaskedTextBox (and other input elements) and more—to the suite. With the inclusion of these HTML-friendly ways to create views and define UI in ASP.NET Core applications, we now offer more than 15 Telerik Tag Helpers in Telerik UI for ASP.NET Core.

Try it Out and Learn More at the Webinar

If you are new to our tools or have only tried some, make sure you download the trial and take them for a spin. You can either download just the Telerik UI for ASP.NET MVC and Telerik UI for ASP.NET Core tools or download a trial of our entire set of .NET and JavaScript tools with the DevCraft bundle. And make sure you register for our Telerik and Kendo UI release webinars (Jan 30 and Feb 1, respectively). 

Register: Telerik Release Webinar
Register: Kendo UI Webinar

Functions as Data: Functional Programming in C#

$
0
0

By realigning your thinking about functions as data, you can uncover new solutions to problems in OOP. Let's look at an example of functional programming in C#. 

In Object Oriented Programming (OOP), we're used to using collections of objects or simple data types. We often sort and filter these collections using LINQ as part of business logic behaviors or for data transformation. While these are useful tasks we frequently perform, it can be easy to forget that functions in C# can be treated as data. If we realign our thinking around functions as data, it enables us to discover alternative solutions to standard problems in OOP.

In this article, we'll look at an example from my C# Functional Programming workshop. The scenario outlines a solution used to score a poker hand. We'll examine an alternative pattern to a solution that utilizes functions as data. Through this new pattern, we'll provide flexibility to the scoring mechanic of the game.

Scoring Criteria

First, let's take a look at the individual scoring functions that are used to produce the final score. Each function is a rule that determines if the hand of cards meets a criteria.

private bool HasFlush(IEnumerable<Card> cards) => ...;
private bool HasRoyalFlush(IEnumerable<Card> cards) => ...;
private bool HasPair(IEnumerable<Card> cards) => ...;
private bool HasThreeOfAKind(IEnumerable<Card> cards) => ...;
private bool HasFourOfAKind(IEnumerable<Card> cards) => ...;
private bool HasFullHouse(IEnumerable<Card> cards) => ...;
private bool HasStraightFlush(IEnumerable<Card> cards) => ...;
private bool HasStraight(IEnumerable<Card> cards) => ...;

The diagram below illustrates the rules of which the game is scored by. While the functions tell if the hand meets the criteria, they don't directly impact the final score of the hand. We need to arrange the rules and evaluate them in order of importance to produce a score and assign it to an enumerator of HandRank.

card-ranks

Determining the Score

Using the rules, we can determine the final score value in a few different ways. Each of the following examples is technically correct and offers its own level of readability and simplicity. The negative aspect to each approach is that the order in which the rules execute is "hard coded."

  1. Maintain a state
    This way of evaluating the score uses a temporary placeholder value to keep track of the score. As each evaluation takes place, the score is updated with the best HandRank available. This method is very explicit, but involves extra code and variables that aren’t necessary to complete the task.
  2. public HandRank GetScore(Hand hand)
    {
        var score = HandRank.HighCard;
        if (HasPair(hand.Cards)) { score = HandRank.Pair; }
         ... 
        if (HasRoyalFlush(hand.Cards)) { score = HandRank.RoyalFlush; }
        return score;
    }
    
  3. Return early
    Using a return early pattern allows us to write intuitive code that returns the best HandRank by returning immediately from the function when an evaluation is found to be true. This method is easy to read and fairly easy to modify as new rules are required by the application.
  4. public HandRank GetScore(Hand hand)
    {
        if (HasRoyalFlush()) return HandRank.RoyalFlush;
         ...
        if (HasPair()) return HandRank.Pair;
        return HandRank.HighCard;
    }
    
  5. Ternary Expression
    The function can be written as a single expression using a ternary operator. This has a similar effect as the return early method, but with even less code. Readability for this method may be easier for some than others.
  6. public HandRank GetScore(Hand hand) => 
        HasRoyalFlush(hand.Cards) ? HandRank.RoyalFlush :
         ...
        HasPair(hand.Cards) ? HandRank.Pair :
        HandRank.HighCard;
    

In all of the previous examples order of operation is crucial. If we decide to add new rules to this scoring function, then we'll need to insure they are inserted in the correct order to determine the proper score.

Thinking Functional

The GetScore operation is stepping through criteria evaluations and matching the first rule that results to true and returning the matching HandRank. Instead of evaluating the functions as individual statements, we can approach the problem from a functional programming mindset. Let's change the way we look at the problem by thinking of the functions as data.

If we look at the individual scoring functions as data, we can identify a pattern. Consider the signature for the following scoring functions.

private bool HasFlush(IEnumerable<Card> cards) => ...;
private bool HasRoyalFlush(IEnumerable<Card> cards) => ...;
private bool HasPair(IEnumerable<Card> cards) => ...;
private bool HasThreeOfAKind(IEnumerable<Card> cards) => ...;
private bool HasFourOfAKind(IEnumerable<Card> cards) => ...;
private bool HasFullHouse(IEnumerable<Card> cards) => ...;
private bool HasStraightFlush(IEnumerable<Card> cards) => ...;
private bool HasStraight(IEnumerable<Card> cards) => ...;

Each function is of the same type, Func<IEnumerable<Card>, bool>. Since we have many pieces of data of the same type, we can arrange them in a collection or array. Next, we'll need to match each function with the HandRank it represents. For example: HasPair will result in a score of HandRank.Pair. Using Tuples we can easily create this mapping without the need for a specialized class. In C# 7.1, we can create a tuple by simply enclosing multiple values in parenthesis. Using the function and its mapped enumerator, we can build the collection.

private List<(Func<IEnumerable<Card>, bool> eval, HandRank rank)> GameRules() =>
   new List<(Func<IEnumerable<Card>, bool> eval, HandRank rank)>
   {
               (cards => HasRoyalFlush(cards), HandRank.RoyalFlush),
               (cards => HasStraightFlush(cards), HandRank.StraightFlush),
               (cards => HasFourOfAKind(cards), HandRank.FourOfAKind),
               (cards => HasFullHouse(cards), HandRank.FullHouse),
               (cards => HasFlush(cards), HandRank.Flush),
               (cards => HasStraight(cards), HandRank.Straight),
               (cards => HasThreeOfAKind(cards), HandRank.ThreeOfAKind),
               (cards => HasPair(cards), HandRank.Pair),
               (cards => true, HandRank.HighCard),
   };

To keep things tidy, we'll wrap the construction of the collection in a single function called GameRules. We can later use this as an extensible point for additional game rules. By moving the ranking system outside of the GetScore method it can be modified or replaced with new evaluations and ranks. For the lowest rank possible, we'll simply use true to represent the default evaluation.

Refactoring with LINQ

Now we'll rewrite the GetScore method using LINQ to evaluate the list. By treating the items in the list as data, we can utilize sorting to ensure they are executed in the proper order. We no longer have to worry about the "hard coded" execution order. We can use .OrderByDescending(card => card.rank) to sort the evaluations from strongest rank to weakest, since HandRank.RoyalFlush is of the highest value.

public HandRank GetScore(Hand hand) => GameRules()
                    .OrderByDescending(rule => rule.rank)
                    .First(rule => rule.eval(hand.Cards)).rank;

Finally, to get the result we'll perform our evaluation. The most efficient way to do this is by using the First LINQ method. Since First is a short-circuit operator, it will stop evaluating the items as soon as it finds the first item which returns true. When the first item evaluates to true we'll take the rank value of the tuple from the data set and return it. The rank value is our final hand score.

Conclusion

Functions in C# are often thought of as static statements that our application can use to change the state of data within the system. By turning our perspective from imperative to functional, we can find alternative solutions. One way of bringing a functional mindset to the problem is by remembering that functions are also data and conform to many of the same rules as other data types in C# do. In this example, we saw how a functional approach changed a hard-coded statement-based evaluation to a flexible sort & map-based evaluation. This simple change expands the functionality of the application and reduces friction when adding new criteria, as no order of operation is predefined.

To add more functional thinking to your mental toolbox, download the free Functional Programming cheat sheet and watch the video Functional Programming in C# on Channel 9.

Viewing all 737 articles
Browse latest View live